Tried RethinkDB for a week. Overall it gave me a very good impression.
Very easy to setup and run
Setting up sharding and replication is quite simple as well
The composable query language is a big plus. I really like the way I can build queries in my code by adding refinements if I need them. Reminds me of ActiveRecord in Rails.
The admin interface is gorgeus and super useful, but I wish I could save my queries.
The developers are very active in IRC and the forum, they responded all my questions very quickly.
Some rough edges I came accross are:
Queries that require boolean logic (e.g. ‘where user.id IN (1,2,3) and user.active = 1’ in SQL) are very cumbersome in RethinkDB right now. The good thing is that this is being addressed on the next release.
I manage to send several JavaScript expressions to the server that made RethinkDB spawn a bunch of processes that ate the machine CPU very quickly, making the DB almost unusable, I had to kill RethinkDB several times because of this. It would be nice if RethinkDB will prevent this.
At the moment you cannot connect instances of RethinkDB on different architectures, e.g. Ubuntu to Mac, 32 bits to 64 bits. Again this is in their list of things to address in the future.
At the end of our exploration we ended up with a flat data structure so we reverted back to our established SQL solution. But I look forward to use RethinkDB again soon.
Update July 2013
Since I wrote this post some issues on RethinkDB has already been fixed. I was using rethink 1.5 at the time. Fixed issues are:
“Queries that require boolean logic (e.g. ‘where user.id IN (1,2,3) and user.active = 1’ in SQL)” was addressed by the inclusion of array operations in RethinkDB 1.6. The equivalent ReQL command would be either of the following:
JavaScript expressions (via the r.js command) have an optional timeout flag so the user can prevent single expressions from taking down the server, since RethinkDB 1.5 (see issue #69: https://github.com/rethinkdb/rethinkdb/issues/69)
When it comes to dealing with asynchronous development in JavaScript there are many tool you can use. This post explains four of these tools and what their advantages are. These are Callbacks, Listeners, Control Flow Libraries and Promises.
Example Scenario
To illustrate the use of these four tools, let’s create a simple example scenario.
Let’s say that we want to find some records, then process them and finally return the processed results. Both operations (find and process) are asynchronous.
Photo credit: bitzcelt / Foter / CC BY-NC-ND
Callbacks
Let’s start with callback pattern, this is the most basic and the best known pattern to deal with async programming.
A callback looks like this:
123
finder([1,2],function(results){..dosomething});
In the callback pattern we call a function that will do the asynchronous operation. One of the parameters we pass is a function that will be called when the operation is done.
Setup
In order to illustrate how they work we need a couple of functions that will find and process the records. In the real world these functions will make an AJAX request and return the results, but for now let’s just use timeouts.
In both case the console log above with log [1,2,3,4,5,6]
Working example here:
Pros
They are a very well know pattern, so they are familiar thus easy to understand.
Very easy to implement in your own libraries / functions.
Cons
Nested callbacks will form the infamous pyramid of doom as shown above, which can get hard to read when you have multiple nested levels. But this is quite easy to fix by splitting the functions also as shown above.
You can only pass one callback for a given event, this can be a big limitation in many cases.
Photo credit: Brandon Christopher Warren / Foter / CC BY-NC
Listeners
Listeners are also a well known pattern, mostly made popular by jQuery and other DOM libraries. A Listener might look like this:
We call a function on an object that adds a listener. In that function we pass the name of the event we want to listen to and a callback function. ‘on’ is one of many common name for this function, other common names you will come across are ‘bind’, ‘listen’, ‘addEventListener’, ‘observe’.
Setup
Let’s do some setup for a listener demonstration. Unfortunately the setup needed is a bit more involving than in the callbacks example.
First we need a couple of objects that will do the work of finding and processing the records.
Note that they are calling a method trigger when the work is done, I will add this method to these objects using a mix-in. Again ‘trigger’ is one of the names you will come across, others common names are ‘fire’ and ‘publish’.
We need a mix-in object that has the listener behaviour, in this case I will just lean on jQuery for this:
A bit more difficult to setup than callbacks in your own code, you will probably want to use a library e.g. jQuery, bean.js.
Photo credit: Nod Young / Foter / CC BY-NC-SA
A Flow Control Library
Flow control libraries are also a very nice way to deal with asynchronous code. One I particularly like is Async.js.
Code using Async.js looks like this:
1234
async.series([function(){...},function(){...}]);
Setup (Example 1)
Again we need a couple of functions that will do the work, as in the other examples these functions in the real world will probably make an AjAX request and return the results. For now let’s just use timeouts.
Note the style used in the callbacks inside the functions above.
1
cb(null,records);
The first argument in the callback is null if no error occurs; or the error if one occurs. This is a common pattern in Node.js libraries and Async.js uses this pattern. By using this style the flow between Async.js and the callbacks becomes super simple.
Using Async
The code that will consume these functions looks like this:
Async.js takes care of calling each function in order after the previous one has finished. Note how we can just pass the ‘processor’ function, this is because we are using the Node continuation style. As you can see this code is quite minimal and easy to understand.
Working example here:
Another setup (Example 2)
Now, when doing front-end development it is unlikely that you will have a library that follows the callback(null, results) signature. So a more realistic example will look like this:
1234567891011121314151617181920212223242526272829
functionfinder(records,cb){setTimeout(function(){records.push(3,4);cb(records);},500);}functionprocessor(records,cb){setTimeout(function(){records.push(5,6);cb(records);},500);}// using the finder and the processorasync.waterfall([function(cb){finder([1,2],function(records){cb(null,records)});},function(records,cb){processor(records,function(records){cb(null,records);});},function(records,cb){alert(records);}]);
It becomes a lot more convoluted but at least you can see the flow going from top to bottom.
Working example here:
Pros
Usually code using a control flow library is easier to understand because it follows a natural order (from top to bottom). This is not true with callbacks and listeners.
Cons
If the signatures of the functions don’t match as in the second example then you can argue that the flow control library offers little in terms of readability.
Photo credit: Helmut Kaczmarek / Foter / CC BY-NC-SA
Promises
Finally we get to our final destination. Promises are a very powerful tool, but they are the least understood.
As you can see, it is quite minimal and easy to understand. When used like this, promises bring a lot of clarity to your code as they follow a natural flow. Note how in the first callback we can simply pass the ‘processor’ function. This is because this function returns a promise itself so everything will just flow nicely.
Working example here:
There is a lot to promises:
they can be passed around as regular objects
aggregated into bigger promises
you can add handlers for failed promises
The big benefit of promises
Now if you think that this is all there is to promises you are missing what I consider the biggest advantage. Promises have a neat trick that neither callbacks, listeners or control flows can do. You can add a listener to promise even when it has already been resolved, in this case that listener will trigger immediately, meaning that you don’t have to worry if the event has already happened when you add the listener. This works the same for aggregated promises. Let me show you an example of this:
This is a huge feature for dealing with user interaction in the browser. In complex applications you may not now the order of actions that the user will take, so you can use promises to track use interaction. See this other post if interested.
Pros
Really powerful, you can aggregate promises, pass them around, or add listeners when already resolved.
Cons
The least understood of all these tools.
They can get difficult to track when you have lots of aggregated promises with added listeners along the way.
Conclusion
That’s it! These are in my opinion the four main tools for dealing with asynchronous code. Hopefully I have help you to understand them better and gave you more options for you asynchronous needs.
I am starting to see a pattern in many JS libraries where they are trying to detect the presence of AMD an act accordingly. I think it is great that AMD is getting so much attention but they usual way this is done has a big issue: It shouldn’t be one or the other.
Problem with this is that if the script is loaded using a common script tag and a AMD loaded (e.g. require) is also present, then it won’t be possible to use the library in the normal way (using the global variable).
You might think that if require is there we should load everything using it, but we have good reasons not to do this. We concatentate and minifiy the most important parts of our JS code, the rest is loaded using require on demand.
So the better way to do this is by attaching the library in many ways as possible:
12345678910111213141516171819
// CommonJS module is definedif(typeofexports!=='undefined'){if(typeofmodule!=='undefined'&&module.exports){module.exports=foo;}exports.foo=foo;}// Register as a named module with AMD.if(typeofdefine==='function'&&define.amd){define(‘foo’,[],function(){returnfoo;});}// Integrate with $ if defined// or create our own underscore object.if(jQuery){jQuery.fn.foo=foo}
Service Objects in Rails allows to neatly separate the business logic of your application in reausable components. This post describes our implementation of this pattern.
We went through the usual story, we started by putting some business logic in controllers and some in models, then decided that all this logic should go in the models and ended up with very fat models tightly coupled to each other.
So when looking for alternatives patterns for organising the business logic I came across the idea of having separated objects to handle this business logic. Somewhere I saw this pattern labeled as ‘Service objects’ (SO). This was way before this very interesting post 7 Patterns to Refactor Fat ActiveRecord Models
The discussions often involved the Single Responsibility Principle (SLP), so most of the examples shown a class with only one public method on it. At first I totally dismissed this as a kind of functional pattern that didn’t fit into the OOP world of Ruby.
But my pain with the fat models made me look into this again. So I decided to give it a try. Since then I have grown very fond of this approach because of the following:
As this objects have little code they are easy to reason about
They are very easy to compose (use one inside the other)
They encapsulate the business logic neatly, so you never has to repeat the same logic in different places
They use dependency injection (DI) heavily so they are loosely couple with the rest of the application
Using DI makes it very easy to swap the dependencies in testing
But still they have sensible dependency defaults, I don’t see the point in injecting dependencies all the time when in 90% of the cases you just need the defaults
Let me show the pattern we are using:
123456789101112131415161718192021222324
classFindInvoicesForClientServicedefcall(client,args={})...invoices=find_invoices_service.(some_args)...enddeffind_invoices_service@find_invoices_service||=FindInvoicesService.newenddeffind_invoices_service=(obj)@find_invoices_service=objendendservice=FindInvoicesForClientService.newservice.(client,args)# in test we just swap the dependenciescollaborator=double.as_null_objectcollaborator.stub(:call).and_return(invoices)service.find_invoices_service=collaborator
The key points in our version are:
the class has only one public method (call)
dependencies are only passed if needed, the class has some sensible defaults that will be used 90% of the time
each dependency injector has its own method instead of a attr_accessor, this is so you can prepare the dependencies if needed
This has been a great pattern for us, we have hundreds of these objects that can be easily composed as needed. This pattern has made our code seriously easier to work with.
Deferred and promises are a very powerful tool for handling asynchronous events. In this blog post I will explain what they are and when to use them.
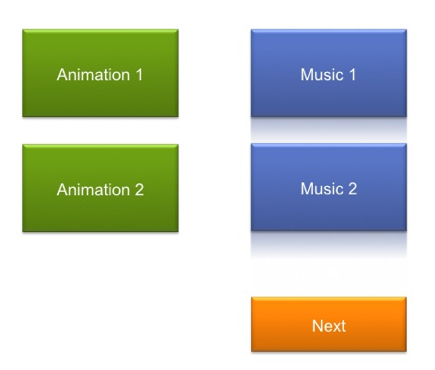
Let’s create gretting cards
As an example let’s say that we are building a UI for a greeting cards making application. Our UI may look something like this:
The user can select an animation, select the music and then click next. Our event flow will look like this:
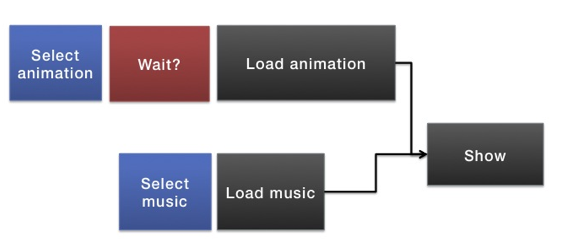
In this first case we know everything we need from the beginning. When the user clicks ‘next’ we know which animation and which music to load. After we are done loading these assets we will show the greeting card. To do this is code we have several options:
We simply tell the library that we want to load these two assets in parallel and then call ‘show’ when done. The library takes care of all the details for us. A library like this is great but we need to know everything that we need to load at the start.
Not knowing everything from the beginning
Now let’s imagine that we don’t want a ‘Next’ button anymore in our UI:
Here we just want to show the greeting card automatically after the user has selected the animation and the music. Maybe not the best user experience but it works for our example. We don’t know the order in which the user will select the assets.
If we want to stick with the previous way of doing thing (knowing everything at the start). Our event flow will looks something like this:
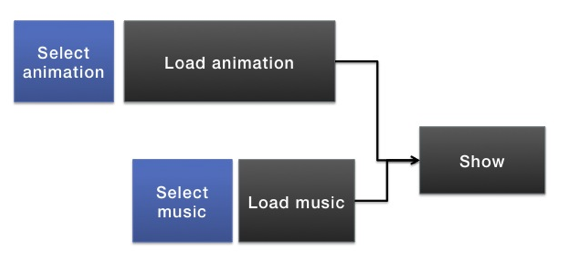
In the above flow we are waiting idle while the user is busy selecting the music. We don’t want this, we want to take advantage of this time to load the assets the user has already chosen. So our event flow should look more like this:
In this flow we start loading the animation as soon as the user has selected it. While the user is busy selecting the music the animation is loading in the background. As soon as the user select the music we start loading it too in paralell.
A library like as Async is not useful in this case anymore. We can however still count like before or we could use conditional like:
This works but it is not very elegant and becomes hard to maintain quickly.
Deferreds to the rescue
Here is where Deferreds shine. But let me explain what they are first. In a nutshell a Deferred is contract for an event that will happen in the future. Easier to explain this with some code:
12345678910111213
// we create a Deferredvardef=$.Deferred();// we add a listener to the Deferred// when the Deferred is done then do somethingdef.done(function(val){//… do something});//… later// we mark the Deferred as done// this will trigger the listener added abovedef.resolve(val);
We create an Deferred object that accepts listeners like ‘done’. At some point in our application we set this deferreds as done (‘resolve’). This will trigger all the listeners.
There are many Deferred implementations like jQuery (1.5+), underscore deferreds, promised-IO. My examples are using jQuery but the concepts are pretty much the same for all of them.
Aggregation
A deferred can also be aggregated (I will explain promises later):
12345678910111213141516
// We create two deferredsvardef1=$.Deferred();vardef2=$.Deferred();// We combine them together using the ‘when’ function. // This creates a new object (Promise) that is the aggregation of the two Deferreds. // We add a listener ‘done’ to the aggregated Promise.$.when(def1,def2).done(function(one,two){//… do something with one and two;});//… laterdef1.resolve(val);//… even laterdef2.resolve(val);
In this case when def1 and def2 are resolved the listener in the combined Promise will trigger.
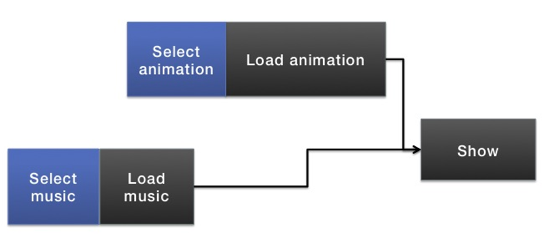
So going back to our greeting cards example. To do this:
We can simply code it like this:
123456789101112
varanimDef=$.Deferred();varmusicDef=$.Deferred();$.when(animDef,musicDef).done(function(){show();});//when the music is loadedmusicDef.resolve();//when the animation is loadedanimDef.resolve();
No conditions, no counting. Quite elegant if you ask me.
What if it is already resolved?
Deferreds have another neat trick. Let’s say that the user selects the music first and it completely loads before we even start loading the animation.
By the time we add our aggregated listener the Deferred for the music has already been resolved:
No problems! The aggregated listener will still triggers, it knows that the Deferred is already resolved and acts as expected. This is something you cannot with common event listeners!
Fail and reject
Deferred can also be rejected as well:
123456789101112
vardef=$.Deferred();def.done(function(result){//do something}).fail(function(){//fallback});//…later, something bad happeneddef.reject();
This gives us a way of handling errors and providing fallbacks.
Promises
A promise is mostly like a Deferred but it doesn’t provide the methods to resolve and reject it. This is useful when you want to give a reference to the Deferred to another object so it can add listeners but you don’t want to give that object the power to resolve the Deferred.
Let’s say you have a caller object with code like this:
1234567891011
// create a loader objectvarloader=newLoader();// ask the loader to load something// it receives a promise backvarpromise=loader.load(…);// add listeners to the promisepromise.done(function(){...dosomething});
This caller receives a Promise from the loader object, it can add listeners to the Promise or aggregate it with other Promises. But it cannot resolve or reject them. Trying to do something like:
promise.resolve();
will fail.
The code in the loader object will look something like this:
123456789
functionload(){def=$.Deferred();returndef.promise();// it returns the promise}//..laterfunctiononLoad(){def.resolve();}
Note the def.promise() method which creates the promise. The jQuery ajax methods does exactly this, it gives you a promise back when called.
You can combine promises to you heart content:
123456
varpromise1=$.when(animDef,musDef);varpromise2=$.when(msgDef,bgDef);$.when(promise1,promise2).done(function(){//… do something with anim, music message and background});
Using Deferreds you can easily code something like this. Where you have many actions happening at the same time, each without a clear start and ending and depending on each other.
Conclusion
In conclusion Deferreds are best suited in situations where:
You have several actions happening at the same time e.g. loaders
You don’t know where the action starts and when it finishes e.g. user interaction
You have other actions that depend on the completion of multiple other actions
Before coming to the JavaScript world I was doing Flex development, so I was quite familiar with MVC paradigm in the front-end side of applications.
When I first started using JavaScript I learnt to do things in the usual way of that time – which is having the DOM as the source of truth. e.g. We will add elements to the DOM and if we wanted to know the length of a collection we will just use jQuery to ask the DOM for how many elements there were.
I soon grew tired of this way of doing things, it was just messy.
Backbone
Backbone captured a lot of attention when it came up, it was the first MVC framework that looked easy to get into. So I decided to try it. It was a great start, the structure of my code started to resemble a lot more what I was used to in Flex e.g. collections, views, controllers.
But there were many times where I would think “What? Do I need to do this myself? Shouldn’t Backbone take care of this?”. For example when a collection changed the view needed to know and I had to hook all these events myself.
Another thing that was a let down is that there is no build-in way of doing live binding in the views. You have to do this yourself e.g. re-render a view manually when something changes (via events). Also doing nested views was more complex that it needed to be.
Backbone just left me wanting a lot more from an MVC framework. So I decided that Backbone was not my cup of tea, it wasn’t really doing enough useful things for me.
Ember
Ember also came up with quite a hype and it looked like the perfect fit for everything I was expecting. It has live binding, a great object model and an excellent template engine.
It takes a while to learn as it deviates quite a bit from the usual way of doing JavaScript, Ember relies heavily on binding instead of events. I got a lot into it, even did a talk about it in my local user group.
I liked it but I wasn’t completely happy with it because:
It is huge, totally overkill for small projects or mobile apps.
It is hard to debug, when something fails it gives you very obscure error messages that are hard to track back to the source.
It adds scripts tags around elements, which breaks CSS styling in some cases.
It required me to declare lots of small components, so for simple things I ended up with too many objects.
It also force me to declare objects in the global space, I couldn’t find a way of not having to do this.
CanJS
Then came CanJS (without the hype of the other two), it is a reboot of the venerable JavascriptMVC project. Bitovi has done a great job at making JavascriptMVC a lot more accessible to newcomers.
CanJS looked intriguing, so I decided to use it in my next project. It was a great success for me. It stroked a great balance between Backbone and Ember. The features I like a lot in CanJS are:
It is quite small, just a bit bigger than Backbone. Tiny compared to Ember.
It has live binding out of the box, and they work perfectly well (although I prefer handlebars, I can live with EJS).
It is a lot more general purpose than Backbone and Ember. For example CanJS has an observable object that can be used in a huge variety of situations, not just when doing MVC.
CanJS has become my MVC library of choice. I really recommend you give it a go in your next project.
The future
I am planning to keep using CanJS in the future, but Angular looks very appealing, I really like the declarative way of doing things directly in html without having to use templates. I am planning to give Angular a go soon.
Javascript is meant to be a prototypical language. But unfortunately it is a half done prototypical language. Internally it works like this but externally it tries to looks like something else. To understand this let’s look at the proto property.
It is extremely easy to see what is happening here. We have just created a prototype inheritance chain between ‘person’ and ‘Animal’. If you ask for a property or method in ‘person’ it will be looked up in that object first, if it is not found there it then will be looked up in the prototype.
proto looks scary because of all the underscores around the name, but in reality it is quite easy and straightforward to understand and use. Unfortunately the proto property is an internal properties only exposed by some browsers (e.g. Chrome, Firefox). So it cannot be used safely.
Object.create makes a new object with the prototype set to the given object. This is heaps better than the function prototype work around. But still using proto is a lot more intuitive.
Being mostly a self taught developer, nobody ever taught me what a state machine was. When I finally stumbled upon them I realised I have been missing out by not using them before.
When I first started learning about them I couldn’t find a good explanation in plain english. So here is my attempt to explain state machines in a simple way and why you should use them.
The code examples below are in Ruby using the state_machine gem. But this are general concepts for any language.
What is a state machine?
In essence a state machine tracks the state of an object and describes the actions that this object can perform at any given time.
A state machine has several components: states, events and transitions.
States
Let’s say we have an ‘order’ object. We could use a state machine to track the state of our order. The order could have the following states:
Open
Placed
Held
Cancelled
Shipped
Returned
The subject of the state machine can be in only one state at any given time. The order can either be ‘Held’ or ‘Shipped’. These are the states. And we can have only one.
If we want to have two states at the same time we would need to have two state machine running in parallel.
Events
We can define events that our state machine can perform. For example:
Create
Cancel
Hold
Ship
Return
Not all events can be called at any time, the available events are dependant on the current state of the object. A state machine manages this logic for us.
In Ruby (using state_machine) we could do something like this:
order.can_cancel? #ask if the order can be cancelled at this time
order.cancel #send the cancel event to the order
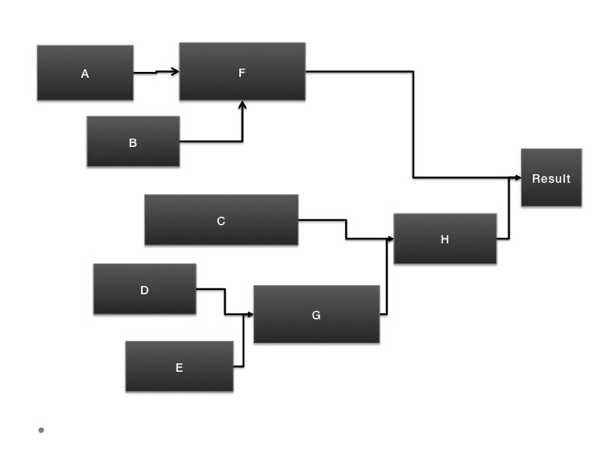
The following diagram shows the state machine flow.
So as you can see in the diagram there are predetermined paths that the state machine can follow. It can move from the ‘Created’ state to the ‘Placed’ state but not to the ‘Shipped’ state.
The state machine will complain if you try to call an event that is not permitted depending on the current state.
Transitions
Finally, when an event is called it may trigger a transition. For example the ‘cancel’ event could trigger the following transitions:
‘placed’ to ‘cancelled’
‘held’ to ‘cancelled’
‘any’ to ‘cancelled’
Transitions are useful for triggering processes that should occur in particular cases. For example sending an email when the state of an order changes from ‘placed’ to ‘cancelled’.
So why you should use state machines?
If it is not clear already the main reason to user them is because a state machine can manage all the complexity of knowing what events and states are available at any given time.
So, that’s my understanding of state machines so far. I am sure I am missing out some stuff but I believe that the basics are here.
Recently I was maintaining a project were the original developer did everything using lists to present data in rows and columns like a table.
So to present something like this:
<table>
    <tr>
        <th >Cosher </th>
        <td>To treat with special fondness.</td>
    </tr>
    <tr>
        <th style='padding-right:12px;'>Flamboyant </th>
        <td>strikingly bold or brilliant; showy: flamboyant colors.</td>
    </tr>
</table>
<br />
they were using a ul like this:
<ul>
    <li>Cosher <span>To treat with special fondness.</span></li>
    <li>Flamboyant<span>strikingly bold or brilliant; showy: flamboyant colors.</span></li>
</ul>
And then styling the list using CSS to make it look like a table.
This is a little less markup than a normal table but what for? It seems to me like the ‘no tables’ mantra taken to the extreme. This is perfectly appropriate content for a table. And using a table makes better sense because:
Developer looking at the code will immediately know what the intention is
The code is easier to maintain because you don’t have to fight with the css to make something look like a table when it is not
The display is consistent in any browser
People disabling CSS will still see a table
So please use tables when appropriate, don’t hate them.
Here is a way for finding out the bounding box (left, right, width and height) of an SVG path in Ruby. You will need ImageMagick and RMagick for this. In Javascript this is quite simple using the getBBox method, but I couldn’t find a similar thing in Ruby.
First install ImageMagick if you don’t have it already. I like to use Homebrew:
brew install imagemagick
Then install RMagick
gem install rmagick
With these two requirements in place you can find the bounding box using a script like this:
123456789101112131415161718192021222324
require'rubygems'require'RMagick'deffind_bounding_box(path)includeMagick#create a drawing objectdrawing=Magick::Draw.new#create a new image for finding out the offsetcanvas=Image.new(1500,1000){self.background_color='white'}#draw the path into the canvas imagedrawing.pathpathdrawing.drawcanvas#trim the whitespace of the imagecanvas.trim!#here is the bounding box information we are looking for{:x=>canvas.page.x,:y=>canvas.page.y,:width=>canvas.columns,:height=>canvas.rows}end